Tampilkan postingan dengan label more. Tampilkan semua postingan

Rabu, 18 Januari 2017

A Bit More Rudder

This is the rudder progerss so far.

 The bottom bearing cup and spiggot

 Using coins to give the right spacing for welding

 The space created for the weld

The plate welded which bolts on the bottom of the rudder

Disassembled

The rudder mounted ready for the
rudder shaft to be connected at the top
Read More..

Rabu, 11 Januari 2017

More Step Work

Ive been modifying the steps in the boat.  This came about at the front because the water level sender gauge needed recalibrating now its on the water.  Previously it was done when it was on dry land during the tank testing etc. It was necessary to remove the front steps to do this and a timely visit from Graham of Matilda Rose fame made the calibration easier as he called out the reading as I twiddled with the adjustment screw 45 feet away.

While I had the steps out I decided to make the top and bottom step liftable as well as the middle one which was already done.  Then it dawned on me that I could take the ply floor out under the steps and and have a cooler area to draw cool air from the bilge when its warm in the bedroom.  A quick temperature check revealed the base plate (black area) was 12.5 degrees while the inside of the room was 23 degrees.  I also changed the 5 micron primary water filter which was visibly quire grubby.  Next time the tank is empty I will move the main stop cock as removing the floor has made more room to position it in a better place right out of the tank.


Then it was on the the rear steps.  For ages now I have been intending to fit the rest of the of the tiny LED plinth lights. This has made such a difference to the appearance of the kitchen area and of course the steps.

Without Flash

With Flash

I am undecided about taking the floor out under the rear steps.  It would make a nice
pre- cooling area for beer and wine, but as the inverter is now under them this adds heat and makes the box area quite warm so I thinking this might be a source of condensation. 
I will consider it again one I have put some additional fans in the side of the steps to dump this heat out.
Read More..

Selasa, 20 Desember 2016

More Electrical Bits

The last couple of days on the boat has really been themed with electrical things.

I was most excited to find this GSM gadget.  I wanted the ability to get the boat ready for our arrival by switching on the inverter which would then power the heating and fridge.  Initially I was thinking just one switch but as I looked I found I could get this 7 channel unit for the same sort of price.  I added a fuse inside the unit as its easier to get to there, I might also add and LED to show the power status.


The black relay is operated by phoning the unit.  The clever bit on this is it will accept numbers form a white list only.  Phoning this relay accepts the number then hangs up (no charge call) and switches the relay either ON or OFF depending on where it was left. This relay can also be TXT operated.

The rest of the blue relays are TXT operated only again on a white list.  A message can be to turn either =ON or =OFF.  As well as a number of other functions a TXT can be sent to get the status of all the relays.

So I have set relay one to switch on the inverter, two to set the heating on and three to control the fridge.  The other channels Im sure Ill find a use for.  Ive put the wiring tails in ready.

Next job was to parallel the alternators.  The reason is because the 115amp alternator charging the start battery is effectively doing nothing after a few minutes whereas the 115amp alternator is working flat out.  Easy to establish as the start one is cool, the domestic one is too hot to touch.

Alternator parallelling is simply joining the output of 2 or more alternators,  but its best not to permanently wire the together.  

To best make the connection a contacter, a type of big relay is used.

This one has a 150amp continuous  rating

There are different ways of switching the relay from a simple switch on the dash, or via a self energising relay system.  What ever way its important that the relay drops when the engine is stopped.  I have fitted an LED to display the status of the contactor. I havent yet installed this on the dash its just on a fly lead.

I have chosen to use a self sensing relay driven by the output or the start battery alternator.  The system listens to the voltage of this alternator, once it sees its charging it switches its internal relay which in turn energises the contacter and the parallelling is made.

This is the sensing system and its adjustable
to ensure correct switching

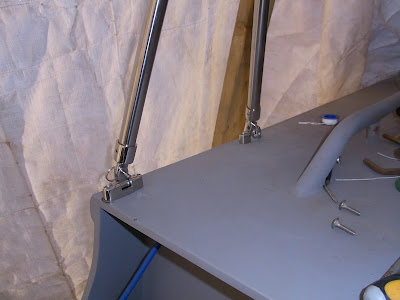
And this is the finished job.


The top alternator is (was) the start battery the lower is (was) the domestic, although once they are joined it is simply one curcuit, each sharing the workload over both battery systems.

The results so far are that both alternators now run at a moderate temperature.  I also noted that the battery monitor was showing 14.6v  I never saw this as high before.  My conclusions so far are that it,s working as it should.  Time will tell and if in the unlikely event it proves troublesome its easy to de-activate.

Read More..

Minggu, 02 Oktober 2016

More Floors

table saw has a bit of trouble with the angle
finishing up with the handsaw
finished floor with proper bevel
The floors are just about all in. Above is floor #12, which was bolted through the keel at the foremost station. As frames continue to go up, Luna is developing a few curves. Pictures of those to come soon.
Read More..

Jumat, 26 Agustus 2016

More Control

Remember when I fitted a new CH boiler and heat exchanger??  No? Here is the blog

The whole system worked really well in fact the heat exchanger worked so well it set up a thermo siphon with the engine water jacket.  The Hurricane was so powerful it eventually produced enough heat to get the 450kg engine block up to 40c in an un-insulated engine room.  Clearly this is not ideal unless the engine needed preheating in arctic conditions which is unlikely at 52N degrees.

The answer was to fit some additional control. (Yes more control systems!) will it ever end?  I decided a motorised ball valve would fit the bill.  I was unable to find a 3/4" valve that had a sprung return so opted for a relay controlled power to open power to close.

Valve with relay above

This is the circuit diagram.


The relay is energised when the ignition is powered up and killed when it switches off. Once the valve motor has reached its travel no power is drawn.

The other relay (top behind) in the system is also powered from the ignition to interrupt the live feed from the heat sensitive switch to the CH pump.  Once the engine reaches 50c the pump to the CH switches on and through the heat exchanger heats the radiators inside the boat. This extra relay is there to interupt the live feed to the pump so it switches off when the engine stops.  This stops the pump running on until it drops below 50c at the sensor which results in the engine not re-absorbing heat from the rads and calorifier.  Before this additional relay was in, the pump would run on pointlessly for up to a totally counterproductive hour until the heat switch cut out.

Hopefully thats it for the CH system.


Read More..

Rabu, 10 Agustus 2016

More Ballast Winterising

As we carry over 2000L of water in the bow tank the trim of the boat is affected between full and nearly empty.

In order to minimise this I decided to put some ballast in the water tank.  As my brother owns a stone worktop company Granite Unlimited he gets plenty of cut outs from the sinks and hobs.  The beauty of natural stone is its free for me, very heavy 30mm is 90kg per Sq/m and its totally unaffected by water.

 This small amount is 750kg worth

Now its in the water tank the leverage being right at the front of the boat has brought it down nicely.  It has displaced about 175L of water so the net effect on a full tank is about 500kg of extra weight and on an low tank nearer 750kg.  Its true we have lost some capacity but is not going to be a problem as I see it because we will simply have to fill up that bit sooner which in turn will mean a more frequent refreshment of new water. The stone is nearly 3000kg a cu/m whereas water is 1000kg


 In the water tank

Since being on the water we have filled no more than 4 times from taps along the river, and the tank was freshly painted when we launched.  So where has all this come from?

 New 5 micron filter on the left

The one removed after around 8000l

Hmm! makes you think.  We also have the 0.5 micron drinking water filter for next to pure drinking water.

While I had the tank empty I moved the stop cock to be right on the copper exit stub from the tank.  I feel a lot happier about that. It was close before but was in a plasticc pipe run.

All this was done mid week while on the boat myself.  We have a rule when we are both on the boat.  I mustnt do any work.  I did however slip a couple of winterising jobs past SWMBO.  I installed a frost stat.  Its actually the original CH controller that came with the Mikuni.  I opted to use the RF or remote version as we can move it around the boat depending on where we want to control the heat more fully, i.e. bedroom or lounge.


I have wired it in parallel so it will trigger if the temperature drops below 5c.  The remote unit which looks exactly the same requires 240v at the receiver end so wont trigger when the inverter is off.  This additional one is battery powered.

The other little job sneaked by was draining out enough water form the generator to top it up with antifreeze.  I never knew if it had any in as I acquired it used so to be sure I have put my own in.


Read More..

Senin, 25 Juli 2016

A Bit Council House

I have been up to quite a few things on the boat but nothing really blog worthy. I do have a lot to say about generators, batteries, alternators and charging but this is still a work in progress.

I have put the 12v toilet back in and fitted a better design non-return valve.


The 230v toilet was OK but had its issues, principally the amount of water used.  Since fitting this valve no backflow has been noticed.  The other issue I had with the 12v toilet was voltage drop on activation.  I have overcome this with a small sealed 12v battery in a cupboard very close to the toilet.

This was the original toilet swap blog.

Its a common joke in the UK that mounting a TV on the wall is a bit "Council House".  It just happens on the boat I decided it would be a good idea as it frees the surface of the unit.


Before

After

Much neater as all the wires are in the wall now.  The extra height is better, more comfortable viewing angle.  It was a bit low before.
Read More..

Selasa, 31 Mei 2016

Shiny Stuff

I have been working with the pram cover maker to make the stainless steel tube frame to take the cover.  Normally he contracts this to a SS specialist.  He normally makes a light alli tube frame as templates then the SS guy does his bit.  Between us we have made the frame combining his know how and my metal skills.  This has saved over £500 in labour. So under the white cover at the back I now have a fully collapsible frame.  IMO the SS guy is on a nice little number.  The 316 SS tube was a dream to work. 

 The screen frame

 The front screen will be a self supporting structure.
More on this when it gets fitted

 Port side


The other shiny bits added are the mushroom vents.  Its one of those jobs I have held back to when I had nothing much else to.  Currently I am waiting for the internal doors and frames and the front doors.  I should get these next week.

6 fitted and one to do later once the hatch is finally fitted

If you look closely you can see the 3G aerial behind the 3rd vent.  The yellow bit is a cover blocking off the hole for the gas fire flue.
Read More..

Jumat, 25 Maret 2016

Doing A Doughnut In My Boat

You may recall I decided to make a Shilling rudder.

This short video shows what it can do.

Enjoy. Sorry about the reflection


It works as you can see and Im glad I went to the extra effort.
Read More..

Kamis, 24 Maret 2016

More Ceiling

Ceiling again today. The center area is going to be pained white and is ply wood the same as the sides.  First the supporting frame.

2 x 1 battening glued and screwed

Working single handed and putting up a ceiling is challenging.  With the aid of the ratchet prop used yesterday for the bucket and some temporary hold ups heres how I did it.


And heres the finished ceiling.


All that needs doing now is a good sanding down and painting.  I will do the bedroom tomorrow having already put up the frame work.
Read More..

Minggu, 20 Maret 2016

The More You Know The Less You Know

I was reading a forum item about water up the rudder stock tube.  This was something I had never considered or been told about although on very hard reverse on my NB I would get water up the tube.  I just put this down to poor design because of its age.  When the water came up it just ran off the self draining read deck, but on this boat its going to go into the engine room bilge.......... Not good.

As I hadnt considered this I needed to work out how to retrospectively fix it.  Much head scratching and I came up with this idea.

I disassembled the rudder, ram and removed the stock.


I then slid a length of PVC pipe over it having first coated the shaft with silicone grease.


I reassemble the rudder and stock then filled the gap between the stock tube and the PVC tube with closed cell expanding foam.


Once cured I trimmed off the excess.


I think this will solve the problem.
Read More..
 
About Boat Plans - Powered By Blogger