Tampilkan postingan dengan label a. Tampilkan semua postingan

Rabu, 18 Januari 2017

A Bit More Rudder

This is the rudder progerss so far.

 The bottom bearing cup and spiggot

 Using coins to give the right spacing for welding

 The space created for the weld

The plate welded which bolts on the bottom of the rudder

Disassembled

The rudder mounted ready for the
rudder shaft to be connected at the top
Read More..

Kamis, 12 Januari 2017

A really good way to spend the morning

Readers of our book will certainly be able to relate. We had a great morning, today, helping to change the Annie Bucks summer configuration to her winter configuration. It starts with a ride to the public wharf, where there is enough space to maneuver. The ride, on a perfectly cloudless day, with temperatures at right about 70F, was gorgeous. The trees are just starting to get color now. Just enough to add highlights to the woods behind the marshes.

The process is much like an old barn-raising and although it involves a lot of heavy lifting and potential injury, I look forward to it every year. Five of us disconnected and lifted the summer canopy  (PP. 77, figure 12 in "Fundamentals...") from its supports and onto a trailer, where it was driven to its winter storage place where we placed it for safe keeping. I dont know how much it weighs, but its certainly in the hundreds of pounds, if not a half-ton, or so. We went to the wharf in the shade, but when we were done removing the canopy, the Annie Bucks cockpit was wide open and full of light. It makes her a whole different boat.

That was the first half, and actually the easier part, of the process. We then had another beautiful boat ride to another local dock where her mast and boom were stored. The mast and boom are required in oystering when dredging or patent tonging (pp. 76  figure 15). The mast is made of iron and its a good thing that most of the guys lifting are watermen - they are extremely strong from the work that they do. Getting a long mast (25?) onto a boat when you have to carry it on a narrow dock (3) can get you knocked into the water very suddenly. Once the mast is aboard the boat, it must be mounted to a support plank, then made upright and then secured with wire rope and turnbuckles. The various lines that hold the mast in place have to be tensioned exactly right, the consequences potentially being life threatening. The booms installation must wait until the mast is ready. Otherwise there would be no place to install it and it would just be in the way. The boom is mainly aluminum, but also hundreds of pounds and long. Still, carrying it is much more pleasant than carrying the mast was.

Im always amazed at how these guys work together, all of them knowing exactly what needs to be done, because they all have the same kinds of boats and after the Annie Buck is squared away, the group will move on to convert the other boats. David has a lot more work to do before he can work with his rig. There are all sorts of lines to inspect/fix/rig. He has to hook up various hydraulic lines and other elements of the system. Hell need to install his culling board. He is gearing up for the work of winter. That means making sure that his engine and everything else important to running the boat is in perfect shape.

Nobody could do this work alone. Its an honor to participate, knowing that my contribution to the effort is minimal, but I always learn things and the rides on the Annie Buck, to me, are worth every bit of it. I look forward to reversing the process in the Spring...
Read More..

Door Furnature

I had a call fron the wood shop to tell me he was ready for the door furnature. So I thourght Id go to a local long established iron moungary store.  My needs wernt difficult, or so I thourght.  I wanted some 3" polished SS hinges, and a SS rebater door lock.  All they had was tat, the hinges were so bad IMO it was a waste of SS and no rebated locks at all.  This is supposed to be a specialist shop.  I then went to B&Q, Homebase and Howdens.  In 2 of these the concept of SS seemed to be alien.  They did a huge range of nasty plated stuff, but not a whiff of SS, and as for rebate lock......Well?  Howdens did have some very nice SS hinges but they wanted over £13 a pair and that was on my trade account!

I resolved to go on the net. I like to support local shops where possible, but they really have to do more.

A Net search turned up a company called e-Hardware  Absolutly brilliant!!  and the even better part quite local to me and were happy to indulge my fussyness in person.  In the end I got EXACTLY what I wanted and even some concealed  door latches I didnt even know existed.

So, excelent quality products, brilliant service and great prices......... How great?  Well the exact same hinges that I liked at Howdens were at e-Hardware for £3.50

I will post pics of this stuff when I get the doors.
Read More..

Rabu, 11 Januari 2017

Little Bit Of A Setback

Ive had a little bit of a setback of late, Ive been watching it hoping it would go away, but as its getting colder its getting worse.

So what is it?

The laminate flooring I used to line the ceiling is distorting. I suppose as the boat gets a tiny bit shorter.  Essentially is compressing and was beginning to ripple midships.  Other option is that the laminate is expanding with the damper weather.

Normally when you lay this sort of flooring its know as a floating floor because its not fixed anywhere and a 10mm gap is supposed to be left all around the edge of any room its laid in to allow for expansion etc.

Compounding this also is:- 1. I have had to glue it to the roof batons to keep it in place. 2. on the port side I did the whole boat in one continuous length of about 12.5m.  Its only this part thats distorted.

The planned repair is underway and involves removing the affected mid section and cutting in a expansion joint above the bedroom door separating the run.

So this is what its looking like.


I shall leave it a couple of days for it to normalise, I have cut some more of the glue to free up more movement.  Then it will be all put back up again and hopefully that will be the an end to the matter.
Read More..

Kamis, 22 Desember 2016

A Boaters Favorite Subject

Yeh toilets again!

Following the removal of the 230v toilet in favor of the 12v again I was left with a gap behind the toilet as I had to remove some extra wall to get the plumbing connected to the 230v one.


I made a template a week or so ago and my brothers stone firm cut and polished a cover plate out of a type of man made porcelain.


So why are there tiles missing on the lower left?  Well, first of all it was an accident of removing the skirting board but then it became apparent this was a fortunate accident as I have another problem that needs fixing and these broken tiles sowed a seed to part of the solution.

The rubber sanitary hose used to take the macerated waste to the holding tank which is sold a "Smell Free" is now after only a year leaching a nasty smell in the boat and needs replacing.  This was supplied by a an expert firm in the field.  When questioned about this I was told that basically all flexible sanitary hose will leach smell sooner or later.  This I find unacceptable and have taken it up with the supplier.  In all fairness to the supplier I dont think they are to blame as they only brand that which is available elsewhere.  Neither the less to be told this hose should be regarded as an item that will need replacing anywhere from a year onwards is just not on.  Plumbing as far as I am concerned is a fix and forget item!

So in order to get the old hose out and new one in access has to be got.  By removing the right hand bathroom cabinet:-


I was able to carefully remove 2 tiles to replace the damaged ones:-


Then using a borrowed Fein Cutter (Thanks Garth at The Boat Yard Ely) I gently cut through the board behind ensuring not to plunge any deeper needed to breakthrough because behind are plenty of services:-


As you can see!  Im pleased to report nothing unintended was cut or even nicked.

So if anyone wants to buy me a pressie, a Feins Cutter will do.  In case youre not sure this is what one looks like.


Anyone??  

Read More..

Selasa, 15 November 2016

The Nice Thing About Having A Boat Is

There is always something to do.  Always a problem to be solved, or a combining of my interests.

I arrived at the boat yesterday afternoon armed with necessary tools to sort out the grotty and dismal array of plants and mostly weeds on our mooring.  This is supposed to be done by the Environment agency who we rent from but there doesnt seem to be a schedule of maintenance but strangely there is a schedule of Direct Debits.  Anyway before I got on with the stuff I like I decided it was best to get this done and out of the way as the weather was reasonable and the forecast was poor.


About 2 hours saw the job done and all the dead nettles, thistles and sapling Elderberry trees were dispatched.  Hopefully this will allow some grass to grow.

I have been playing with  streaming CCTV for a while now and having bought a new Webcam decided I needed to run some new consealed wires to get the signal back to the laptop in the lounge and then out though the router to the interweb.  Knowing the limt for USB is 5m I saw an adaptor that extends USB over cat5e.  On my last visit to the boat I duly installed a length of cat5e cable in the bedroom ceiling down behind the wardrobes, under the bathroom cabinets and into the lounge drilling necessary holes as I went along all of which are out of general sight. All of this took several hours.

Once this was done I powered up the Webcam only to find for whatever reason that it would only send a 174 x 122 image not the 1280 x 1024 it was bought for.  A bit of digging on the canal forum as there are lots of very cleaver people there with a combined mass of knowledge on all subjects lead me to order a 15m powered USB cable.  Prior to installing the cable I tested it and all was good. 

How pleased was I that when I put the cat5e in the ceiling void I decided to put in an additional trace wire. The result was the new UBB cable was fitted in about 20 minutes.

The intention is to stream live video from the boat as we cruise along, or sometimes if we are just sat mooring.  This can be seen at the Vaughn site.  If you go over there you can become a follower and you will get an email when the camera goes live.  All of this is free and theres currently no adverts on the video feed.

Next up was to run some more cat5e (2 lots) so I can run the bedroom TV on an HDMI extender as this too has a 5m limit and get HD TV in the bedroom rather than just what comes down the coax feed.  While I had the carpet up to hide the cables I sorted out the creaky floor that has been anoying me on my seemingly evermore frequent visits to the loo at night.

This morning it was time to service the generator.  It has reached 2400 hours and the oil was looking decidedly black.  With the oil and filter changed and the diesel filter checked for water (none) and changed it was the turn of the impeller.  This as you can see was definitely in need of changing.


The fan belt was checked for wear and adjustment and both were found to be fine.

A while back I moved the Inverter to under the stairs See Here.  And having sorted out the charging so the charger works much harder it then got really hot which caused it to reduce its output so it remaind happy. Result back to square one after a while of running. See you solve one problem and another problem arises!  The only thing to do is to put some extraction fans in to dump the heat.  The easiest way to power these is from the inverters own fan power supply, that way they would only be on as required.  So this meant taking the inverter out again to gain access to the fan wiring.  I took no chances this time.  I photographed the wiring just to remind me not to wire it up wrong.


The fan on the Victron is 24v so I got 2 x 12v 5" fans and wired them in series, drilled 2 x 5" holes in the stair sides just next the the inverter, put in some wiring with an in line connector and hey presto it all worked.


I just need to get some nice covers for the outside of the stairs.


Its not too much of a problem as its very difficult to see them.  They are not in general sight.

The inverter now runs cold to the touch and is once again outputting maximum charge.


Read More..

Kamis, 20 Oktober 2016

Its Been A While

We have been away for a week wild camping in the motorhome down to Cornwall and the west country.  This is wild camping at its best. 

 Cheddar Gorge

In line with our love of canals a visit to the famous Caen Flight of locks was on the agenda.

This is my picture of the site.


Before we went I ordered a load of stuff which has now started to arrive.

So far delivered and collected are:- New battery box fiberglassed, kitchen and bathroom taps, bathroom sink, hob, integral microwave comi oven, washing machine, fridge freezer, the TV unit, the internal door handles, door glass,  and the power cables for the.

So I will be getting on with installing all this new kit in the next few days.


Read More..

Jumat, 14 Oktober 2016

A Job That Well Remember


You probably havent noticed that Ive been away for a while. Writing time has been scarce, because among the many things going on here, weve been in the final stages of several projects. Our projects tend to be especially time and labor intensive during their final construction, and soon we will be posting photos of some things that have been in the works for a long time.

Among these, we have just finished one of the largest models that we have ever done. I cant really say much about it, because it is in a conspicuous location and we must wait for our client to make their own official announcements. What I can say is that it is in New York City and that our customer is in the business of making some of the finest things in the world. They are dedicated to beauty and precision. While it would be wonderful to be able to say exactly where and what I am talking about, I cant - yet.

Every model that we make has the aspect of being a learning experience. This was certainly no exception. Boats and their usage can always be classified in a number of ways and this one is extreme in that sense. The subject is a work of art, but also represents scientific "state of the art" at the highest level. The subject is in the worlds headlines as we speak, but that is all the clue I can allow.

When the models home is finally open, you will see that it is in a state of the art "place" containing many, many things that will make people say "wow!" The windows there are covered over for now, but when those covers are removed, everyone will be able to see in and it is exciting to know that our model will be among those things that people will see. Thousands, perhaps tens of thousands of people pass by these windows on a daily basis. Its certainly an honor for us and, of course, we are waiting for the time that those covers will come down.

The materials we used in this project include machinable foam, steel, brass, silver, gator-foam, various kinds of wood, as well as rip-stop fabric andother things. It was necessary to make modifications to equipment that was never designed to handle the size of parts that we needed and to come up with some "unusual" methods of working specific only to this project. It could only be built in segments here. In New York, it all came together. I can tell you about the transportation logistics another time.

As with many of our models, there was a period of time when it was truly ugly. When its shape was rough or when it or its constituent parts were unfinished and/or full of putty. Sometimes it seems that the uglier a model is in its construction phases, the more beautiful it turns out in the end. There are times when I prefer that people do not see our models during construction for this and a host of other reasons. Its a funny thing. When seeing other works of art or things of beauty, I dont ever think of them as ever having been anything but beautiful.

When we installed this model, the room that we installed it in was going through the same thing. It was comforting to remember that other things that are truly beautiful must also have their "less than pretty" phases leading up to that beauty, when they are in apparent disarray, dirty, and to anyone who doesnt understand what is involved in making something special come together, it could easily appear to just be an aimless mess. Some people might have interpreted the rooms that we were in to be such. How wrong they would be!

If you know what you are looking at, you recognize that these are necessary stages in the construction of a beautiful place. The work involved is tremendous, fast and furious. There is noise, there is dirt and there are pieces of things everywhere. One can not stay in any one spot for more than a moment or you find yourself in the way. It is really a symphony, seemingly cacaphonous, but the finale will be spectacularly beautiful and those that enter this room after that point will be given no clue as to what it took to make it what it is.

I need to say some things about the team that is building this place. They include masters from several disciplines such as carpenters, electricians and others. The pride that they take, not only in their work, but in the fact that they are among the best in their fields and especially so in the City of New York, is well earned and it was an honor to work with them. I would love to list some of their other previous accomplishments, but to do so might give too many clues as to the place of which I am speaking. (Added 4/29/12 - Now that the IWC Flagship Boutique has opened in New York, I can say that those stores include Gucci, Armani, Tiffany and others of the type.)

They are focused, they are disciplined and they are knowledgable. They also showed us a certain kind of respect that comes from a knowledge of what it takes to make unusual things. I am very bad with names, so I wont attempt to use any here for fear of getting them wrong or omitting someone that I shouldnt. But our thanks to everyone that worked there at every level.

It is a complicated project. The number of things coming together at one time is staggering. People walking by right now may not even know that there are people inside the place. When its done, most people will have no awareness of how it became the collection of great things that they experience. How it became will be forgotten, except by anyone who had any part in its coming to be. I know that this has been the kind of experience that I will long remember.
Read More..

Kamis, 06 Oktober 2016

The Decision to Build a Boat

"The desire to build a boat is one of those that cannot be resisted. It begins as a little cloud on a serene horizon. It ends by covering the whole sky, so that you can think of nothing else. You must build to regain your freedom." 
-Arthur Ransome, 1923


If your goal is to sail the world on a limited budget (in my case, very limited), it really makes no sense to build a boat yourself. The materials for the bare hull are often far more expensive than a turn-key secondhand boat. Most would-be backyard boat builders dont want believe this-- they think, "Well, those people must be using expensive, exotic hardwoods for their boat. Im going to build mine to workboat standards." or "I can buy un-milled lumber and do the milling myself" or some variety of, "Well, Im different." I know people think this because I thought it, and Ive heard it from many armchair boat builders. I now know that it is not true-- I got some amazing deals on materials, found salvaged hardware on eBay, Im using roofing tar as my bedding compound, galvanized iron fastenings, and white porch paint to finish her off. Luna is not just a workboat, she is a down home workboat. And I have still spent way more than I would have on a used boat. In fact, had I purchased a used boat, I might already be out on the water like these awesome folks. Sometimes in life you have to do what you want, even if it doesnt make sense.


I really just wanted to build a wooden boat. I knew it was impractical, nonsensical, and that I didnt have the skills or know-how, but I was taken by the romance and beauty of wooden boat building. Funny enough, Ive found you dont need to know much about wooden boats to begin building one. Lucky for me, I came across George Buehlers designs and book. This guy is really extraordinary. Hes pared down the beautifully complex combination of art and science of boat building for those of us who just want a safe boat to go to sea in. No treatises on hydrodynamic theory, no hand waving, no boat building mysticism. Just practical, lay instructions on how to build a boat. Simple. 

down home boat building fun
(17 bucks on Amazon)

Granted, due to my lack of experience, I will be churning out a vessel more akin to a swamp boat than a fine New England yacht, but Id be willing to bet the Clampetts had a helluva lot more fun than the Vanderbilts.
Lastly, this documentary perfectly captures the essence of wooden boat building (click below to watch it for free!):


"Building Charlotte"-- A beautiful documentary about the Gannon and Benjamin Marine Railway, an extraordinary boatyard located on Marthas Vineyard.


Read More..

Senin, 19 September 2016

10 Simple Steps to a Boat Frame

When I read other boat building blogs, Im always a little embarrassed for myself. Other builders shops are so clean, their joints so perfect, the tools shiny and brand-name. You wont find much of that over here on Building Luna. As mentioned earlier, I have a rather down home (see Urban Dictionary) boat building style. I still feel pretty unsophisticated in the world of boat builders.

On the bright side, I guess I dont allow myself to feel intimidated by all the builders doing stuff the "proper way." This isnt rocket science. Take, for example, the frame I built on Monday (the last one!!):
Step 1: This here is the frame building table-- just plywood underlay screwed to an IKEA platform bed frame that my mattress used to be on. The mattress has been on my bedroom floor for the duration of frame construction-- the likely cause of my many intimate encounters with insects over the past 6 months (see Giant Millipede Incident of 2012)


Step 2: Draw in the frames using measurements from the table of  offsets. Note roof tar, sawdust, and regular dirt dust. 
Step 3: Screw some blocks to the table at your frame lines to butt the frames up against. Most plans are drawn to the outside of the planking.  These blocks are the width of my planking so I dont have to worry about that detail while assembling the frame. 


Step 4: Get frame lumber. I milled the 2 x 4s needed for the frames out of this gorgeous 8/4 rough rift sawn white oak that I snagged for cheap in Austin. 

Step 5: Cut the frame lumber. The angles at the butts are easily taken from the lines drawn on the table. Note from the picture in Step 2 that the bevels on the frames are sawed before assembly. I took these angles from the lines plan. While they are probably "shallower" than what Ill need, itll make beveling the standing frames less of a pain.

Step 6: Soak the joints that will not be glued with copper napthanate.

Step 7:  While I do make some effort to get the joints to fit nicely, Its not important to me to get them perfect where no one will see them. I smear them with roof tar.

The poor boat builders dolphinite. $27 for a 5 gallon bucket.
Step 8: Smoosh the butt joints together and liberally apply a waterproof adhesive where the gusset will go.
Step 9: Temporarily screw on the gussets while the glue dries (the screws will later be replaced with bolts).
Step 10: Screw on some temporary cross-braces to make sure the frame maintains its  shape until the planking goes on. Done!

Actually, this probably wasnt the best frame to document here on the blog. Its construction was a bit atypical. Normally, gussets go on front and back side of the frame . Initially, they get clamped on and holes are drilled through the whole thing for bolts. Then everything gets diassembled, and glue is applied to the gussets. Finally, the whole thing is bolted together and cinched tight. Still pretty easy peasy.

The frame shown above is different from the norm because the floor at this particular station is high enough that it will serve as the gussett on the back side of the frame. I temporarily screwed on the front-side gusset until the frame gets clamped to the floor, then Ill drill for bolts when I know exactly where the floor will hit the frame.

Cant wait to add it to Lunas growing body!


After I finished building the last frame, I marked all of the frame gussets where the chine notches need to be cut with a handsaw.
Im hoping to convince Ramon to make this job part of his daily workout.


Its nice to know that even the professionals sometimes make do with what they have.
Read More..

Senin, 12 September 2016

A Little Problem

We have spent the last few weeks exploring some of the tributaries of the Gt. Ouse, The River Wissey, The Lt. Ouse and The River Lark.  As lovely as these rivers are they are pretty weedy and so a couple of times the exhaust temperature light came on meaning the raw water intake filters were clogged.  Trouble with this is this starves the rubber impeller of water and it runs dry.

Once back on the deep and straight Gt. Ouse and the engine has nearly 100 hours I decided for the first time to open the engine up and let a good deal of the 114hp have its wicked way.  Top RPM is 2500 so I held back to 90% or 2250rpm  The main engine temperature remained at 85c which is normal.


After about 3 minutes the exhaust temperature warning came on.  I was a little concerned as I had cleared the filters before setting off about 20 minutes earlier and the Gt. Ouse is mostly weed free.


I cut the engine and drifted into the side to investigate.  I checked the filters and they were clear.  So after letting the engine cool down I restarted and saw nothing being drawn up from the river.  I removed the water uptake tube and felt inside the impeller housing and could feel damaged impeller blades.  As the system wouldnt self prime I filled the filter manually which was enough to get it primed. After which we were able to continue as before at about 1400rpm.


Once back at Ely I checked with Ely Chandlers to see if they had an impeller for my engine but they were unable to help but they kindly let me use their address for delivery when I found one in Leeds.  So many thanks for their help.


This afternoon it arrived and I swapped it out which took about 30 minutes.


Left buggered, right new

The new one has an 2 extra blades so I guess the original has been superseded.  Once changed and the system primed manually everything was back to normal, well at least on static tests.  A moving test will be done tomorrow.

Clearly the impeller is intolerant to running dry.  In the service book the impeller is a 1000 hour inspection so I think I have just been unlucky for now.  Its all a learning curve.


Read More..

Rabu, 24 Agustus 2016

Hang on a Minute I Gotta Drain It

There comes a time when the pressure builds and you just gotta do something that you have put off too long....like putting drain plugs in a boat. The thought of drilling big holes in the transom scared the heck out of me, but I couldnt put it off any longer. After contemplating and procrastinating, I reviewed the cross-section of the transom to determine the lowest point in the transom I could drill a perpendicular hole and not breach the plywood bottom planking. I also looked at photos on this blog to see where I had located screws to hold on the bottom planking near the keel as I did not want to drill into one.
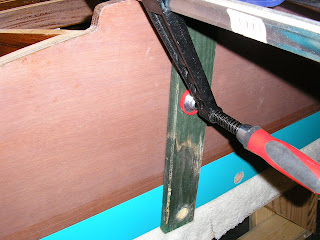


I then decided to bore a guide hole in a 2x6 and clamp it to the inside of the transom and another scrap board to the outside to prevent break-out when I drilled through. The first hole when well, and then I moved to the other side of the keel and located the hole and drilled another pilot hole in the 2x6 in the right location. The pictures show the second hole about to be drilled.


I tried to insert the drain sleeve into the hole from the outside, but it was too snug. I used a rotary drum sander to open it up slightly until the sleeve would ease in. Then I marked the sleeve with a Sharpie to leave it about 1/8" long. I removed the sleeve and a tubing cutter was used to cut it off. The sleeves were filed slightly around the outside to provide some fine scratches to ensure a good bite. Epoxy was mixed and coated the inside of the holes. Then some high density #404 filler added to thicken it up and smeared into the holes. The sleeves were inserted fully from the outside and I rigged up a bolt with large washers in each one to make sure they were held firmly in the hole while the epoxy cured.

The next day, I used a small ball peen hammer and slowly peened the brass sleeve over to provide a flange on the inside of the boat. The drain plugs fit in nicely and its all good.


Read More..

Senin, 22 Agustus 2016

Solar Powered

Now the roof has been painted I was able to fit the solar panels.  That was this weeks mid week visit to the boat.

Having made and fitted the mounting brackets it was time to wire up and screw them to the roof.  I had already laid in the wires in the ceiling void so this made the job a bite easier.  What made it difficult was the almost continuous rain over the last 2 days.  Anyway, after dodging what I could and getting the occasional dampening this is what it looks like.


Now the technical bit.  


As the panels output at 30+ volts and this needs to get it into a 12v battery bank safely by reducing the voltage.

This needs another bit of kit, an MPPT controller (this site explains how they do what they do).

This is my MPPT charge controller.


The grey cable is to the remote meter which displays loads of information about whats happening. Of most interest is the live data on the input voltage, amperage and battery levels. 

I have wired the negative via the shunt so this will record on the Victron battery monitor.

This is the instruction manual for the 10amp model but its exactly the same.

So today when the sun did shine well I was getting 35amps! Even when it was cloudy and pouring down I was still getting 5amps.

Conclusion.................... It works so hopefuly this will reduce or eliminate the need to run the generator.


Read More..
 
About Boat Plans - Powered By Blogger