Tampilkan postingan dengan label New. Tampilkan semua postingan

Minggu, 15 Januari 2017

New Welder

Needless to say, a steel boat needs a bit of welding... ok tons of it.

I came across Hennessey Welding Supplies in Google and rang them.

The boss man was a pleasure to deal with and on Weds October 24th I went to collect it in Cork.

Lovely people to deal with and got a great new welder for the job.

It is more than capable and has a remote wire feeder. The total length from main unit to torch is 9 metres.
This will make life much easier as the inside of the boat will be hard to move around.


Many thanks to Jim and Owen.

Link to them on the links section.
Read More..

Rabu, 28 Desember 2016

New Gas Main

After discovering Id installed the gas main wrong by using soldered joints I had to re do it.  This involved a bit of cosmetic damage to get at the old one to remove it and replace with the new.  This will be fixed in due course.

So now all joints are made with compression fittings and all joints are available for inspection and adjustment if necessary.


Well you get the idea.  I have done the soapy water test which it passed and the Mk1 nose test and at the weekend I will be borrowing a manometer to do a drop test.  And for full belt and braces I have booked a gas safe inspection as well.

I finally got around to fitting the gas struts to lift the bed.  


And finally an Ahh! moment out of the window today.

15 goslings!
Read More..

Selasa, 22 November 2016

New Batteries

The new batteries arrived today.  What with holiday season and the need to have these made to order has meant a 6 week wait.


The new set have some additional features.  The principle requirement was to have a system that would evacuate the hydrogen that builds up when the batteries are charging. I certainly dont want another episode like before.

The system sold to me also has the added benefit of auto topping up.

So this how the new setup looks.


The vertical tube on the left is the venting tube. This connected nicely to the existing vent.


The vertical tube on the right links by a snap connector with a one way valve to a pressurised bottle.


This is filled with de-ionised water and is pressurised by the built in hand pump.  There is a small paddle wheel that goes round to show when water is going in.  When this stops the system is topped up.  The cells cant be overfilled as each cap has a float valve.

No lid will be require as the terminals are all insulated.  I still have the put the proper output cables on but these need to have terminals crimped on and will be done tomorrow.

The good news is the charging side of the inverter didnt suffer any damage and is working fine.
Read More..

Jumat, 04 November 2016

Lets start our new Blog

Permit us to introduce ourselves... We are Model Boats by John Into & Nancy Price.
We may be new to the idea of blogging, but we are not new to making model boats. I have been doing it for 50 years. Nancy for 18. Weve made well over 300 models of all kinds. Weve also written a serious book about how to make models entitled "Fundamentals of Model Boat Building". You can see photos of our models and information about our book at http://intothings.com/

Its an unusual way to make a living and its given us opportunities to meet and work with all sorts of people of a variety of backgrounds. Weve also had opportunities to see and make models of some very interesting boats.

We would like to hear from anyone that is interested in boats, models, things in miniature, or anything else that might come to mind...

You can also find us on Facebook at http://www.facebook.com/model.boats?sk=wall
Read More..

Rabu, 05 Oktober 2016

New Video Live Video Stream

In anticipation of the upcoming boat lift  on 16th March I have been asked buy a few people abroad to put a video up of it.  This of course I will do and in time lapse as well, but I will also attempt to stream it live as well.

Over the next week or so I will be testing the stream by broadcasting at various time on GMT between 10.00 and 17.30.

I would appreciate as much feedback to my email address kwade.01(at)gmail.com.  I will try to answer but not in real time if the chat box is open.


Read More..

Rabu, 28 September 2016

New Genset Frame

This is the new frame I have made to do 2 jobs. 1st job is to support the rear of the engine. Previously the 230v alternator body did this. The new 12v alternator isnt designed to do this


This doesnt look much but it took several hours of head scratching and trying different things. There was 2 main problems / considerations in the design. The 1st and most important was the maintain all the original parts so it could be put back to original. 2nd, I wanted it all to fit back in the original sound reducing box.  The other minor problems were to ensure access and use all the original bolts and the exhaust pipe route got in the way. The final consideration was to ensure the new alternator could be fitted and removed as the pad mount lugs are wider than the diameter.

The pads of the alternator will sit flat on spacers on top of the flats of the bottom angle irons and bolted through 
Read More..

Minggu, 14 Agustus 2016

New Central Heating

Last Tuesday I set about installing a new central heating and hot water boiler.  Although the Mikuni MX60 originally fitted has done sterling service for 2 winters, it did run hard and long which is actually good for this type of heater.

I decided the replacement would be a Hurricane SCH25 as it has more function and control.


I gave my self a couple of days to do this.  First job of course was to remove the Mikuni which took about 2 hours.  


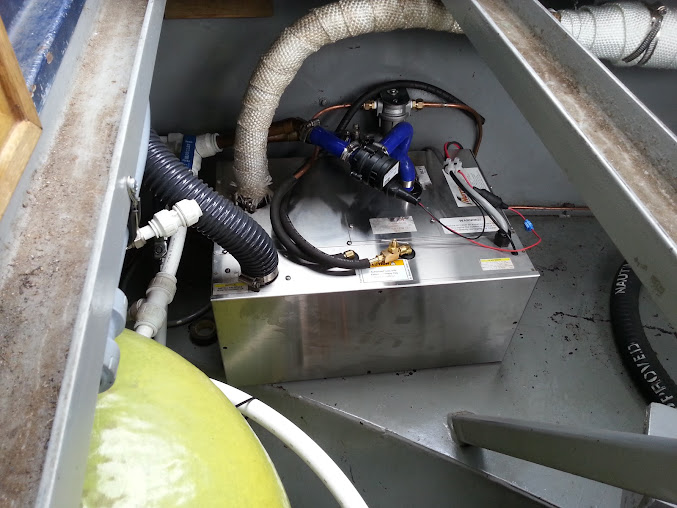
With that safely removed and packed away the next job was to drain the engine calorifier coil as I would also be installing a flat plate exchanger to recover engine heat into the radiators which the SCH25 control system is able to do.


 20 plate 44kw heat exchanger


This is placed in series with the calorifier coil. The left hand (blue) pipes are from the engine the right hand (white) go the the central heating system and the SCH25 calorifier coil.  


Once the engine water has reached 70c this aquastat switches on the circulation pump and feeds the harvested heat into the CH system but without firing the SCH25.

This of course can be used in reverse to preheat the engine from the Hurricane but this would need another pump.  There is a small amount of thermo siphon already so I might consider putting in a 1 way valve to stop this as heating the engine without the option is wasteful.

Once the system was up and running I was getting (from the engine alone) 56c of water through the CH system.  Basically free heat when cruising or charging.


Reading taken from the towel rail

After 3, yes 3 days! I had all the plumbing done, and the heater installed and the wiring put through.


I had to cut a larger hole for the exhaust.  The old one was 1 1/2" and the new one is 2".  I didnt want to put yet another hole in the boat so how to do it?  My plan was to clamp wood either side of the hole and run a new pilot. But no theres a much better way shown to me by Garth at Ely Boat Yard.  This has to be tip of the year so far. So obvious really!

Use the previous hole saw as the pilot
 by mounting both on the arbor   

How neat is that?

New exhaust fitted

As always putting in wiring neatly all takes time.  The previous room stat had only 1 pair of wires the new one needs 3 pairs + I heft a spare for an extra frost stat but probably wont be needed.  This involved taking down one of the kitchen cupboards, the one with the most stuff in it of course!


Followed by the wiring back to the control box.


There are 3 extra wires here too, one for the GSM remote for the controlling the heater by TXT, one for the extra but probably not needed frost stat, and another for a room stat in the bedroom if it proves necessary.

Then finally all connected.


And with permission from the manufacturer in Canada the GSM remote wires soldered on to supplement the  switch on the system remote panel.  Special permission to not void the warranty

.
And here with the panel switch off but the GSM switch on, system working.


So that was that.  It was a bigger job than I expected and if was presented with a bill for the time it took me I would be questioning very seriously.  I would think it probably took me 30+ hours.

All I need to do now is learn how to program the room stat/timer controller.  Its too cleaver for its own good so they provide tutorial videos on the Heatmiser website.

To come:-  The new prop has arrived.


And some new seating and storage for the stern deck.

This is the template to build to

Read More..

Rabu, 11 Mei 2016

New Blogger Fitting out a Widebeam boat The adventure begins

Fitting out a Widebeam boat: The adventure begins.: So. The adventure begins. Next tuesday will see us leave our Norfolk cottage, to spend a few months in a small caravan while we fit out our ...

See what I have spawned.  All the very best Ken, you will enjoy it. 
Read More..

Sabtu, 06 Juni 2015

Free New yankee workshop sailboat plans

Tips New yankee workshop sailboat plans these days i discovered the actual New yankee workshop sailboat plans Search results for New yankee workshop sailboat plans it is not easy to obtain this information In the survey I get that not a few people who need a pdf version for New yankee workshop sailboat plans here is the content one photo New yankee workshop sailboat plans
Read More..

Selasa, 05 Mei 2015

Access New wooden boat plans

New wooden boat plans Foto Results New wooden boat plans Homemade Fishing Pontoon Boat Plans Classic Wooden Boat Plans RC Model Boat Plans Free Wooden Boat Building Plans Free Plywood Boat Plans
Read More..
 
About Boat Plans - Powered By Blogger